Blog Widget by LinkWithin

Wednesday, October 21, 2009

Canon Selphy ES40 review

Canon Selphy ES40

Price (at time of review): $149.99 (mfr. est.)

Key Specs

Print Technology: Dye sublimation
Interface: USB 2.0; PictBridge/USB; memory-card slot; optional Bluetooth
Supported Paper Sizes: Card (2.1x 3.4 inches); postcard (3.9x5.8 inches)
Maximum Resolution: 300x300dpi
LCD Size (Diagonal): 3.5 inches
Dimensions (HWD): 9x9x5.4 inches
Weight: 4.8 pounds

Canon Selphy ES40 Review

Reviewed by: Susan Glinert
Review Date: October 2009

There’s a scene in Woody Allen’s futuristic sci-fi movie, Sleeper, where the hero comes home and finds his appliances in the middle of a furious argument. When we saw the Voice button on the front of the Selphy ES40, we had a bad feeling that the printer was going to wake up and announce, “Hi! I’m Phil, and I’ll be your printer today!” Then we would have to immediately consult the manual to disable this feature. (We like our appliances quiet and docile.) Fortunately, the voice feature isn’t obnoxious—the perky-sounding female voice merely announces that printing is finished and walks you through certain menus.

If you enjoy listening to appliances (or even if you don’t), this $149 photo printer is a good investment. It’s a competent, compact photo printer that’s easy to set up and use, and the print quality is terrific. On the down side, the cost per photo is high, like with the Canon Selphy CP790 we reviewed just before this model, especially compared with printers from Epson and Kodak. So you'll pay for the companionship.

The Selphy ES40 looks and feels just like a boxy 1950s radio, complete with a handle for lugging to the beach. The front panel sports a 3.5-inch LCD panel and an assortment of buttons for accessing the menu, setting the number of copies, toggling voice guidance on and off, and setting trim. The Creative button lets you add a variety of special effects, such as soft focus, vignette, pinhole camera, nostalgic (sort of faded), smooth skin (great for wrinkle removal), and starlight. Here is also where you’ll find a variety of built-in layouts, such as calendar, plus the ability to add frames, clip art, and speech bubbles. One notable omission—the software cannot shrink a picture to fit the paper.

The memory card slots are located underneath a sliding panel at the top of the printer.

Despite what you might think at first glance, the wheel on the front doesn’t tune a radio—it’s used to cycle through menu options or photos on a memory card. Memory-card slots are located underneath a sliding panel at the top of the unit, which keeps dust and coffee from finding its way into the printer. The connection ports are on the left side of the printer. Best of all, there’s no power-brick transformer, just a slender power cable that plugs into the back of the unit. Once you’ve inserted the paper/cartridge pack and attached the power cord (there’s no battery option), you’re ready to print.

This Selphy might look like a radio, but the manual states that it may not be placed within three feet of one, nor a TV set or other device that generates strong magnetic fields. The printer requires about six inches of extra space on the back side for its air vent. You also need to leave some clearance in front of the unit. The photo paper is stored inside the printer in a vertical orientation; when you make a print, the sheet emerges from a slot in the front, parallel to your desk. The Selphy ES40 then rotates the paper 90 degrees and draws it back into the printer. (Strangely, it's cool to watch.)

While you don’t need to use a computer with the Selphy ES40 to print photographs, you do need one to read the instruction manual. A 20-page printed beginner’s guide covers the main features, but for complete feature coverage, you’ll need to read the PDF manual supplied on the CD. Here you’ll find directions for the extra features the printer offers: automatic red-eye correction, image trimming, color adjustments, layout variation, and special effects. You can also make calendar pages and sets of ID photos, both conveniently built into the software.

The Selphy ES40 is especially easy to load up with consumables, because the 50-sheet paper pack and dye-sublimation cartridge are a single unit. Installing the combo is as simple as removing the orange plastic tab and sliding the unit into a slot on the right side of the printer. We like this arrangement, because the packs make the printer especially portable—no need to stash both cartridges and paper and then fumble around with a feed tray. (The printer doesn’t need one, because the paper is stored inside the unit.) The convenience trade-off means that the printer itself is a bit bulkier than competing models—9x9x5.4 inches—and weighs almost 5 pounds.

The paper/cartridge pack is inserted in the top of the printer.

You can use the printer independently with memory cards, or you can connect it via USB to your computer or camera. (Cables are not included, and unfortunately, you can’t print directly from a USB key.) The driver and the Selphy Photo Print utility installed without any problems, although the software required that we reboot the computer.

Selphy Photo Print is a very basic app for printing photos and adding simple clip art, speech bubbles, text, or frames to your photo. This underpowered app can only use TrueType fonts, and it only sees photos that reside in the My Pictures folder, a malady that also affected the Selphy CP790. Once you’ve selected a picture, you can magnify an area, apply rotation, or let the program auto-adjust the image. There’s no way to save preferences or settings; selecting another photo means starting all over again. And if you plug a memory card into the printer, you’ll have to exit Photo Print, because the app won’t be able to find the printer again until you do so.

Because the Selphy uses dye-sublimation technology to print (as opposed to inkjet), it features the 300x300dpi resolution and 256 levels of color typical of snapshot printers that use the technology. The four-color cartridge also includes a protective coating for each photograph, making the prints reasonably resistant to water and scratches. We carefully positioned a drippy glass on top of a print and left it there for about 20 minutes with no harm to the photo. We also placed the photo face down on a wood floor and rolled a chair over it with no perceptible damage. Canon claims a 100-year life for the photos if they are stored in the dark; constant exposure to light reduces the lifetime to 10 years (or 30 years, if kept under glass).

All of the Selphy's editing tools and controls are located on the front of the printer.

Each photo took exactly 80 seconds to print, both when printed from the computer and in stand-alone mode using an SD card. That time compares favorably with Canon’s less-expensive Selphy CP780 (59 seconds for PC-based printing, and 1 minute and 13 seconds in stand-alone mode), because the timing includes paper rotation as well as printing. But it’s almost twice as long as the pricier Sony DPP-FP97 Digital Photo Printer (which printed in 42.6 seconds and 44.8 seconds, respectively).

It was worth the wait, though, since we were impressed with the quality of the photos. We saw clear color without either washed-out highlights or muddy low-lights. Printing directly from a Canon PictBridge camera, the computer, or memory card made no difference to the image quality. In all cases, the photographs were virtually perfect and equal to or better than drugstore prints.

You'll recognize that you're paying for convenience here, however, if you compare the cost per print to the prices at your local pharmacy's one-hour photo service. You can purchase Canon's 50-photo cartridge/paper combo pack for $19.99 (40 cents a photo) or buy a more economical 100-photo pack for $31.99 (32 cents a photo). These prices are fairly high compared with the Epson PictureMate Dash PM260 (25 cents a photo), but about the same as the Canon Selphy CP790 we recently reviewed. If you are feeling particularly flush, you can add glitzy gold or silver frames (or clip-art highlights) to your photos via special cartridges offered by Canon; you load these specifically when you want to do print an image with gold or silver highlights, and they're usable only when printing from a computer. Expect to pay about $1 each for these prints; the gold and silver cartridges cost $19.99 each.

Indeed, the running costs for this machine are fairly high. On the upside, Canon does offer a one-year warranty for parts and labor, in a world dominated by 90-day warranties. If your printer breaks during this time and Canon’s tech service can’t solve the problem via phone, you’ll get a replacement and a prepaid label to return the defective unit. Despite the parsimonious software bundle, this printer is a very able choice—if you can afford the media.

Read more...

Lite-On iHOS104 BD-ROM review

Lite-On iHOS104

Lite-On iHOS104 BD-ROM Review

Reviewed by: Matt Safford
Review Date: June 2009

Over the last few years, the prices of 1080p-capable LCD monitors have fallen dramatically, to the point where solidly performing displays like the Asus VH222H can be found for not much more than $150. And 25.5-inch and larger LCDs are becoming increasingly common—and increasingly affordable. HDTV prices, too, are taking a similar tumble, making them appealing alternatives to PC monitors when connected via HDMI. All of these trends are making the idea of watching stunning 1080p Blu-ray movies from your PC ever-more enticing. If you've just blown your budget on that new LCD TV or monitor, we know of no cheaper way to watch Blu-ray (on a PC or otherwise) than the $70 Lite-On iHOS104 BD-ROM. It won't burn Blu-ray discs (or any other type of recordable media), but if you're looking to watch Blu-ray on a budget, this is the new drive to beat.

Of course, you'll want to make sure your PC's hardware can handle Blu-ray playback before buying the iHOS104, or any Blu-ray drive. CyberLink, the company that makes the playback software bundled with this drive, has a free BD Advisor application available that will scan your system and tell you if you're Blu-ray ready, or what you may need to upgrade.

The iHOS104 is an internal drive, so you'll have to make space for it in your case. And because it won't burn CDs or DVDs, you'll have to keep your old DVD burner installed to keep that functionality at hand. (That may make the iHOS104 a poor fit for small-form-factor cases that can accommodate only one optical drive.) But both novice and veteran PC users should find installation straightforward, so long as their PC's power supply has a free Serial ATA power connector and the motherboard a spare SATA port.

Hooking up this Blu-ray drive isn't any different than hooking up any standard Serial ATA optical drive. Once you mount the drive in a free 5.25-inch bay, connection is a matter of plugging in two cables to the back of the drive: Run the included SATA data cable from a SATA port on your motherboard, and connect a SATA power lead from your power supply. The whole installation process took us less than 10 minutes. If your case doesn't match the black bezel that comes pre-installed on the front of the drive, there's a silver replacement included in the box. (For more on installing a Blu-ray optical drive, check out our Weekend Project feature story "How to Install a Blu-ray Burner.")

Cyberlink PowerDVD

CyberLink's PowerDVD is bundled with the drive. It does a good job of handling Blu-ray playback, as well as playing several other disc/file formats.

After closing up your case and powering on the PC, Windows should find and install the iHOS104's driver automatically. You'll then need to install the included CyberLink PowerDVD BD Edition software. (Installation went smoothly for us, even on our recently built Windows 7 system.) After entering a license key upon starting PowerDVD for the first time, we popped in a Blu-ray copy of Pan's Labyrinth. The image quality looked great on a ViewSonic VX2260wm test monitor, and it was even more impressive when we connected the PC to a larger HDTV via HDMI. We found CyberLink's PowerDVD software to be as simple and capable as most other DVD software we've used.

Those with a desire to burn Blu-ray data disks will have to look elsewhere (and spend more than twice as much) for a Blu-ray burner, as the Lite-On iHOS104 can't record discs. But if all you're looking to do is watch 1080p Blu-ray movies on your PC (or a TV connected to it), this drive is the cheapest option we've seen, and it gets the job done admirably.

Price (at time of review): $69.99 (mfr. est.)

Read more...

AMD Athlon II X2 240e review

Price (at time of review): $77 (mfr. est.)


Key Specs

Socket Type: AM3; AM2+
Number of Cores: Two
Operating Frequency: 2.8GHz
Front-Side Bus: HyperTransport 3.0
L2 Cache: 1MB (512K per core)

AMD Athlon II X2 240e Review

Reviewed by: Matt Safford
Review Date: October 2009

Intel may have cornered the market on high-end desktop processors for the time being with its über-expensive Core i7-975 and its somewhat less expensive quad-core variants. But AMD, ever-cognizant that the mainstream and budget arenas are where most CPUs are sold, continues to innovate in this area. At the time of this writing (late October 2009), the company announced no less than eight new Athlon II processors, ranging from the dual-core Athlon II X2 235e (running at 2.7GHz and priced at $69), up to the quad-core Athlon II X4 605e, clocked at 2.3GHz and priced at an estimated $143.

Six of these new processors have an "e" appended to their names, indicating that they are rated for low power consumption. The "e" chips have a maximum power rating of 45 watts, compared with the typical 95-watt draw of today's standard Athlon CPUs. We looked at the Athlon II X2 240e, which has a clock speed of 2.8GHz and 1MB of total L2 cache; it should sell for around $77. Like all current AMD Phenom and Athlon processors, this CPU can be placed in an AM3-socket motherboard (and paired with DDR3 memory), or in an older, less-costly AM2+ motherboard, which uses less-expensive DDR2 memory.

Apart from the low-power rating for many of the new chips, what's the difference between AMD's new Athlons and its more-expensive Phenom II CPUs? Mainly, the Athlon II lacks the Phenom II's 6MB of Level 3 (L3) cache. How much this affects performance depends on the application. In our tests of AMD's recent $99 quad-core Athlon II X4 620, we found that the Athlon II X4 was nearly able to match midrange Phenom II chips in some applications, but it fell far behind in multicore-aware applications such as the Sony Vegas video editor. As the Athlon II X2 240e chip doesn't have four cores, that level of performance with apps like Vegas will drop off accordingly. But unless you're using professional-level content-creation software or other fully multi-threaded programs, you aren't likely to see a major performance difference between Athlon II and Phenom II processors that have similar clock speeds and the same number of cores.

Power users concerned only with maximum performance likely won't be interested in these energy-sipping CPUs, but those looking to build or upgrade a mainstream PC should take note. These low-power processors pull just a bit more than half the power that their standard counterparts do, making them a great choice for machines that aren't often powered down. And if you're considering upgrading an older AM2+ system with a new CPU, grabbing one of these lower-power processors for your new system could end up saving you money on your electric bill over time. That's because, unless you're running a large, power-hungry 3D-graphics card, the CPU is generally the component in your PC with the biggest power draw.

In our tests, the dual-core Athlon II X2 240e couldn't quite keep up with AMD's recent $99 quad-core Athlon II X4 620, again particularly with Sony Vegas, which is optimized to take full advantage of multiple CPU cores. However, with software that isn't as optimized for multiple CPU cores (and most software today still falls into that category), the Athlon II X2 240e did surprisingly well, especially considering that it costs about 25 percent less than the 620 and uses just a little over half the power of its quad-core counterpart.

On our 64-bit Cinebench 10 test, which taxes the CPU to render a large, photo-realistic image, the Athlon II X2 240e's score of 6,103 was noticeably below the Athlon II X4 620's score of 9,840. And in our Windows Media 9 Encoder test, the 240e took 5 minutes and 21 seconds to covert our test file, a minute and a half longer than the quad-core 620. But in our iTunes 7 conversion test, which isn't fully optimized to use multiple cores, the 240e benefited from its faster clock speed (2.8GHz), converting our 11 test files in just 3 minutes and 23 seconds, which is 26 seconds faster than the 620 CPU. (It runs at 2.6GHz.)

As noted, though, on our Sony Vegas 8 test, designed to drive every core a CPU has to the max, the dual-core Athlon II X2 240e can't really compete with the quad-core Athlon II X4 620. In our Vegas MPEG-2 rendering test, the 240e took 7 minutes and 49 seconds, while the 620 slipped in nearly three minutes faster (5 minutes and 7 seconds). Clearly, if you frequently use video-editing or professional graphics programs like Adobe's CS4 (which is also fully optimized for multi-core CPUs), a quad-core CPU is well worth the extra money. And if you still want to save some money on your electric bill, AMD's new Athlon II X4 605e features four cores, plus a power-friendly 45-watt maximum power draw. Of course, if you're editing massive numbers of large media files, particularly HD images or video, much more powerful (and power-hungry) CPUs like AMD's Phenom II 965 and Intel's Core-i5 and Core-i7 processors will save you loads of time waiting for your projects to render. Whether that saved time is worth spending a lot more money on a CPU and compatible components depends on how often you edit, and how much you can tolerate waiting around for your PC to finish rendering your projects.

While more-powerful CPUs are available for just a little more money, the $77 Athlon II X2 240e is still speedy enough for common PC tasks, and it never felt sluggish in our Windows 7 testbed PC. Its 45-watt maximum power rating is just over half that of many other mainstream CPUs, and it's even more power-efficient when compared with high-end performance CPUs, so it should save you some measurable money in the long run. And those looking to save money now will appreciate this CPU's compatibility with less-expensive AM2+ motherboards and DDR2 memory. This is a safe pick for budget-conscious upgraders and builders, and well suited to efficient, everyday productivity tasks should you see it in a prebuilt PC.

Read more...

How To Upgrade Your Laptop Hard Drive

These days, a lot of laptops come with pretty big hard drives, all things considered. It's not hard to find 320GB or 500GB drives in even the relatively affordable models. That wasn't always the case, though. If your laptop is a year or two old, you might find yourself running out of space.

Or perhaps, you just feel that your drive access is too slow. Your drive may be large enough, but it's an older 4500 RPM or 5400 RPM model and you want to move up to a newer 7200 RPM drive, perhaps with more cache.

The good news is, unlike many parts on modern notebooks, the hard drive is usually something you can swap out. The bad news is, it takes a little bit of work. In this article we'll show you how to copy the contents of your notebook's drive to a new one, then install it.

We'll be using a Dell XPS M1330 (Buy Now) here, along with a brand-new 500GB Seagate Momentus 7200.4 drive (Buy Now). But our advice will be as generic as possible, so you can easily apply it to your own system.

Dell XPS M1330

Stuff You'll Need

Before we get started, let's talk about the parts you'll need. Obviously you'll need your laptop and your new hard drive—typically a 2.5-inch SATA laptop hard drive (unless your laptop is really old).

To get into your laptop, you'll need some small screwdrivers. This can vary a bit depending on your laptop, but it's a good idea to have micro flathead and Phillips head screwdrivers. You may also need a Torx screwdriver (the little six-pointed star shape). These are cheap and available at any hardware store.

We'd advise against trying to use tools that don't quite fit, as tempting as that may be—it's easy to strip the screws, and you probably don't have extras lying around that are the right size and length to replace them. For most laptops, the little screwdrivers are the only tools you'll need to get inside.

If you're going to re-install your operating system from scratch, that hardware is all you'll need. We're going to copy the contents of our current drive to the new one, though, so we're going to need an extra piece of hardware and some software to do that. We'll talk about the software in a bit, but the hardware we'll need is a USB-to-SATA adaptor. We're using a Sabrent USB-DSC5 adaptor kit that sells for around $20, and can hook up either SATA or IDE laptop drives. Continued...

Sabrent USB-DSC5
click on image for full view

Copying Your Drive

If you're going to reinstall your operating system from scratch, you can skip all this. We want to show you how to preserve your data, though, so we'll walk you through it all.

First, make sure your laptop is plugged in. The drive copy can take a long time, and you don't want to run out of power in the middle of it. That would be, well, bad.

Note that we're using a Dell laptop, and nearly every Dell computer these days ships with a recovery partition and a hidden partition of diagnostic tools. If you don't have a laptop with these sort of hidden partitions, this will be a little easier. Given the popularity of Dell computers (and others with hidden recovery/diagnostic partitions) we figured we'd make things a little harder on purpose.

First, you need to hook up your new hard drive to your USB port with the SATA-to-USB adaptor. It's really rather self-explanatory. Then boot into Windows.

Now it's time to install the drive cloning software. If you're using a Seagate drive like we are, you can use Seagate's free DiscWizard application to copy your drive. MaxBlast 5 is the similar app for Maxtor drives. This is basically a free, vendor-specific version of the disk copying tools from Acronis.

We want to keep this as vendor-neutral as possible, in case your new replacement drive isn't made by Seagate/Maxtor. We generally like Acronis' products, so we'll use their Migrate Easy 7.0 tool. This is a $40 application, but it's got a free, fully-functional 15-day trial. If you're only going to clone one drive one time, that's all you really need. Miray's free HDClone software gets rave reviews as well.

You'll have to reboot your computer after installing Migrate Easy, then launch the app. Make sure your new drive is hooked up with your USB-to-SATA adaptor before booting up. Once in the software, click on the Disk Clone option to launch the cloning wizard. After it scans the drives, you'll be presented with a choice between "Automatic" and "Manual." For many drives, Automatic will work fine. Because we want to copy the hidden partition over, we're going to choose Manual.

We're prompted for the source hard disk. With the internal hard drive selected, we can see how the 150GB drive is carved up into several partitions. This is the one we want. We're then asked for the destination drive, which is obviously our "USB" 500GB drive.

We're given three options for the old drive—Create a new partition layout, Keep data, or Destroy data. We want to keep data, the default option, in case anything goes wrong and we need to replace the old drive.

Now a crucial step in our Dell drive cloning. We're asked what moving method we'd like to use, and given options between: As Is, Proportional, and Manual. Proportional is usually fine, and will attempt to grow each partition by the same relative amount.

However, with drives that have recovery partitions, this is a problem. Proportional sizing can play havoc with the recovery partition, which we really need to remain the same size.

So we'll choose As Is. This will make all the partitions on our new drive the exact same size as the old drive. This is a tremendous waste of space! We have a 500GB drive, and it will look like less than 150GB, just like the current drive. That's okay. The plan is to copy all the partitions over at the exact same size, preserving the functionality of the recovery and diagnostic sections, then manually adjust the size of the primary OS partition after we have the drive cloned.

Now we're shown the final drive structure, and you can see all that unallocated space we're wasting. Again, if your laptop has no hidden partitions, you don't have to go through all this mess. Just choose an Automatic copy and you should be good to go.

After clicking Proceed, the computer reboots and begins its byte-by-byte copy of the drive.

After the Copy

After the computer reboots, locks partitions, and clones the drives, we still have a little work to do. The cloning operation can take a very long time, especially if you're doing a byte-by-byte copy like we are (ours took several hours), so don't be alarmed if it's not exactly speedy.

Once the copy is complete, it's time to do a little surgery on the laptop. If you're going to install the OS from scratch on your new drive, this is where you rejoin our How-To in progress.

First, unplug your laptop and remove the battery (there's usually a battery latch on the bottom). Wait a minute to make sure all the power has dissipated from the system—you never want to take a screwdriver to your computer if there's any current in there at all.

How you remove and replace the hard drive in your laptop will vary wildly by manufacturer and model type. Some you'll access through the empty battery compartment. Some you may have to take the entire shell off, or remove the keyboard from the top side.

Some, like our Dell XPS M1330, have a set of screws you remove on the bottom specifically to access the hard drive, which then slides out of the side (in our case) or is revealed by lifting a cover. If you have no idea where to begin, do a search for "[notebook model] disassembled" and see what comes up. There are lots of photo guides and videos to taking apart most popular notebook models.

Once you remove your old hard drive and replace it with your new one, then screw everything back together, you're ready to go.

If you didn't have any hidden partitions and were able to use an automatic or file-by-file clone of the drive, or if you're going to install your OS from scratch on the new blank drive, you're basically done!

Fixing Partition Sizes

We did a sector-by-sector copy of our drive to preserve functionality of the hidden partitions, so we still have a little work to do. We need to resize our primary partition (the C: drive) to fill up all that unused space in our new larger drive.

In Vista, you can do this pretty easily with the built-in disk management tool. In the Start menu, type "manage" to filter search results that will include "Computer Management." Click on that. In the computer management tool, on the left side under "Storage" you'll see the "Disk Management" option. Click on that, and you'll see all your drives and volumes listed in the center pane.

From there, we just right-click the primary C: partition and select Extend. A window pops up asking us how big to make the partition, and it already defaults to the maximum available size. All we have to do is hit Next and it's done.

That's really all there is to it. Of course, depending on the type of hidden/utility/recovery partitions you may have and their location on the drives, you may not be able to use the Disk Management utility to extend the partition.

Also, this Disk Management doesn't offer this functionality in Windows XP. For that, you can use the annoying command-line utility from Microsoft called diskpart.exe. Using diskpart.exe can be confusing and obtuse, but Microsoft has instructions that may help. Finally, if none of that will work, you can rely on a third-party app like Partition Magic or Partition Master, though those tools aren't always free.

Final Thoughts

Replacing the hard drive in your laptop is actually a pretty easy process for most people. Most laptops make it fairly easy to access the hard drive, even if it's not immediately obvious. Most laptops don't have special hidden partitions that won't work properly if they're resized.

So for most users, you can do an easy file-by-file type ("Automatic") copy that is pretty fast and you don't have to worry about any sort of partition resizing or anything of that sort.

Even if you have those sorts of partitions, you can make life easy by doing a fast clone of the primary partition only, skipping all the recovery/diagnostics/whatever partitions altogether. You won't have use of them once you upgrade your hard drive, but if you're okay with that, it makes life a lot easier.

Of course, some would argue that a better alternative is to simply re-install your OS from scratch on the blank drive. This requires backing up all your data, re-installing all your applications, and copying all your data back. All of which is a pain, but it results in a nice clean installation that isn't gunked-up with stuff you don't use anymore, and besides, you back up your data regularly anyway, right?

If that's the case, you simply remove the old drive, slap in the new one, put your OS install disc in the optical drive, and start from scratch. It's simple and effective, if time-consuming.

The only time things get a little hairy is if you have a laptop with special partitions that need to remain the same size, and you want to make sure they still function when you get over to the new drive. This requires making a very slow byte-by-byte copy first, which leaves a lot of unformatted space on the drive, then adjusting the size of your main partition later to use that empty space.

If you update the hard drive on your laptop, or have done it in the past, head to the comments for this article and share your experiences and tips.


Read more...

10 Tips for Turbocharging Windows 7 Gaming

Windows Games Explorer Tips
The Games Explorer in Windows 7 is much more useful. In Vista, it was almost as if Microsoft was ashamed of the idea of people playing games on their PC. The Explorer lived in the right side start menu, not show up in the programs listing and, if you had a lot of games, it would take forever to load.

The Games Explorer in Win7 is much more flexible. It actually shows up as a group in the "All Programs" now. And there's other nifty stuff you can do with it. It's still not the release version of Windows 7, so some features (like finding updates) don't work. But you can still get a lot of benefit out of the Games Explorer.

Drag the Games Explorer to Your Desktop
Those of you who are neatniks about their desktops can ignore this, but you can now drag the Games Explorer from the Start Menu to the Windows 7 desktop. It's just another shortcut, and a double click will open it.

Drag Your Game to the Games Explorer
If you've ever had to scroll down a lengthy list of applications to find the publisher of your game, then launch it, the Games Explorer is your friend.

In the old days, some users would create a kind of virtual Games Explorer by force-installing all games to a common directory, like D:\Games. The Games Explorer now effectively virtualizes this.

Even Steam and Stardock Impulse games can now be dragged from their Start Menu entries into the Games Explorer.

Pin Frequently Used Games to the Task Bar
If you find yourself playing a hot new often—something we all do on occasion—even the chore of opening the Games Explorer takes too long. If you right click on one of the game icons in Games Explorer, it will give you the option of pinning it to the Task Bar. Now your game is just a single click away. You can right click on the icon in the task bar any time to unpin it.

Use Parental Controls
If you're using a shared family PC, and you want to avoid exposing small children to violent games, use Parental Controls. Note that Parental Controls only work if all accounts are password protected, and the account you allow your kids to log into is a standard user account (not an administrator account).

Other Windows 7 Gaming Tips

Calibrate your display—Windows 7 includes a nifty display calibration setup. In the control panel click "Hardware and Sound", then "Display", and then the "Calibrate color" link in the left column. This will create a profile for gamma and color adjustments, and optionally even TrueType settings.

If you already have a profile installed for your display, particularly if it's a wide color gamut display, then you may not want to use the Windows 7 calibration tool. This is particularly true if you're a digital photographer or videographer who wants to have a wide gamut display calibrated for Adobe RGB or other wide gamut color space.

On the other hand, if you have a wide gamut display, and you want to calibrate it for gaming and normal desktop use, you might want to set it for sRGB. Once set up for sRGB, you can use the Windows 7 calibration tool to get the color output that's most accurate.

While we're on the topic of displays, screen resolution has its own context (right click) menu. This will bring up the screen resolution menu. On it, you'll find a link to "Advanced Settings." Click on that, and you'll get the classic display property sheet. See the tab labeled "Color Management?" That takes to a screen with a single button labeled, oddly enough, "Color Management."

From that button, you can get to a very detailed screen that helps you manage the color for your display devices, and also includes another route to the Windows 7 display calibration tool. Tread carefully, though, as you could end up making all your images and games look either very dull or quite garish.

If there's a profile for your specific display, you can choose either ICC or sRGB viewing conditions. This way, you can have the best of both worlds: ICC profiles for photo and image editing and sRGB for normal desktop use and gaming.

DOS Games? On Windows 7?
Play old DOS games with DOSBox—Windows 7, like Vista, doesn't play nice with a whole lot of old DOS games. If you want to get your nostalgia fix on, we suggest trying DOSBox, a great, free, open source DOS emulator. Get it at DOSBox.

The Return of MSConfig.exe
Disable unwanted startup programs with msconfig.exe. In Vista, the easy way to do this was through Windows Defender. Just go to the Tools menu and choose Software Explorer.

That option is gone from Windows 7, at least in the RC. Instead, open the Start menu and type "msconfig" then press Enter. Our good old friend the System Configuration menu will pop up, and the Startup tab can be of great help in preventing unwanted applications, background services, and tools from running every time you boot up. (I'm looking at you, QTTask.exe.)


Read more...

Upgrading a Graphics Card: 20 Must-Know Tips

Maybe there are statistics, maybe there aren't, but we're willing to bet that in the computer enthusiast space, the most-upgraded part of any self-respecting system is the graphics card. That's probably doubly-true when it comes to geeks like the ExtremeTech staff that have at least one computer built especially for gaming—which means we upgrade graphics cards religiously.

Upgrading Graphics Card
The graphics market is ever-evolving, and our computers evolve right along with it. There are few feelings worse than that sense of desolate jealousy you get when you drop a brand-new video card into your system only to read—usually the very next day—an announcement of a newer, better card.

Not long ago, we presented you with a big batch of hints for when the inevitable time comes that you have to swap out your computer's motherboard. Now it's time for a similar piece, but this time we're focusing on upgrading the graphics card for your system.

The rules are the same: This is not a tutorial, a how-to, or a here's-exactly-what-you-do. The Internet is chock full of such articles. Rather, this is a collection of handy tips that to compliment such tutorials and make them that much easier.

Choosing the Right Card

Before you even begin to upgrade your computer's graphics card, you have to procure its replacement. Thus, our first set of tips is about choosing the perfect card for your impending upgrade. Remember, this isn't a step-by-step, so here, in no particular order, are our tips.

  • Depending on the age of your current system, be prepared for the worst. If your computer hasn't been upgraded in several years, you might need to upgrade lots of other parts simply to facilitate a graphics card upgrade. While there are a few AGP cards still available on the market, you'll likely want to upgrade to a PCI Express graphics card. If your motherboard doesn't have a PCI Express X16 expansion slot, you'll have to upgrade the motherboard—and therefore, the CPU and very likely the memory as well.
  • Set a budget before you pick out a graphics card. That way, you won't get carried away and spend more money than you actually have. The budget should take into account the current state of your finances, and also what level of graphics prowess constitutes an upgrade for you. If your last video card cost $100, you might be able to spend a similar amount for a performance boost; if your last one cost $600, get ready to spend a bundle.
  • With a budget set, get the most powerful GPU, with the largest amount of onboard memory, you possibly can. The more muscle you get now, the longer you can wait before your next upgrade.
  • Factory overclocked cards can be nice, but are sometimes overrated. They're generally more expensive than cards that run at performance specifications. Do lots of research to ensure that any cost difference is worth it in terms of a performance boost.
  • Brand should be your last consideration, in most cases. Unless you've had terrible luck with a particular brand and wish to avoid it, go with the brand that offers the best price for the particular GPU you wish to add to your system

Preparing to Remove the Old Graphics Card

The tips that follow assume you have a graphics card on that you're planning to insert into your system, after removing the currently-installed card. There are always some steps you should take before you actually perform the physical upgrade, and doing so will make the whole process go more smoothly.

  • Download the latest drivers for your new graphics card's GPU. Save the file somewhere to which it's easy to navigate (the desktop, or the Downloads folder in your user directory).
  • If you're interested in before and after performance scores, run a few benchmarks before you pop the old card out. While the proof is in the pudding and the biggest indicator of your new card's performance will be how fast it runs current games with detail settings cranked up, it's still nice to be able to quantify the boost in performance.
  • Uninstall the current drivers before you power down the system to remove the old card. Purging the system of old drivers will help keep bloat to a minimum.
  • Remove any overclocks before you remove the old card. Set the CPU, FSB, RAM and graphics subsystems to run at spec. If you wish to overclock your system, do it after you've installed the fresh hardware.

Performing the Physical Swap

Now it's time to actually open up the computer and swap out the old hardware for the new. Here are some hints to make your efforts more successful.

  • Power down the computer and unplug the power cord before you proceed. That way, if you accidentally brush up against the power button while you're working inside the case, you won't turn on the computer. That would be a bad thing—you don't want to be digging around inside the computer on a live motherboard.
  • Get the cables out of the way before you remove the old card. Lots of current PC cases feature the power supply mounts on the bottom of the enclosure, and the CPU power cable might run right atop the graphics card. Unplug it and tuck it in somewhere. Unplug the PCI Express power cables from the old card and get them out of the way, too.
  • Don't forget: Lots of motherboards have locking clips on their PCI Express X16 slots. There's a release lever somewhere along the slot (usually on the side opposite the expansion bracket). Don't force the old card out of the computer or you can break the locking clip; trip the release and remove the old card gently.
  • Store the old card in a safe place, preferably in an antistatic bag. Save it as an emergency backup card in case the new one arrived broken or dies before its time.
  • Sometimes it's easier to connect PCI Express power cable(s) to the new card before you actually insert the new card into its expansion slot.
  • Dress any cables safely away so that they don't block the new card's fan from spinning. If you're installing multiple cards, check all the fans to ensure all cables are clear.
  • Power up the computer and observe the new card's fan before you close the case. Make sure it runs freely.

Watch Those Cables

Completing the Process

You're almost done, but there are still a few steps left in the process and, therefore, we have a few more tips to give.

  • After you power the system on and the OS loads, cease any automated driver installation routines. Launch the driver installation file you downloaded before you made the physical swap.
  • After you've installed the drivers, go into the driver applet and make any settings you wish. For example, be sure to enable CrossFireX/SLI, if applicable, and tweak any performance settings you wish.
  • We tend to leave most of the settings such as antialiasing and anisotripic filtering up to application settings, but that's up to you. Force any settings you feel like forcing, but remember any tweaks you make so that you can reverse them if something goes awry.

  • Check the GPU temperature within the driver applet's appropriate page. Ideal temperatures vary from one GPU to the next, so do your research and see what the GPU should read at idle and make sure it's not overheating.

  • Finally, burn in the new graphics card before you start playing games. Grab 3DMark Vantage (or 3DMark06 if you're running a pre-Vista Windows OS) and set it to loop a demo. Observe it periodically, allowing it to run for at least an hour, and watch for any unwanted graphics artifacts. Another good burn-in program is Furmark

If all seems well, launch your favorite games and blast away! See how high you can set their detail levels and still achieve a playable experience. You'll enjoy playing your old games with new graphical splendor—have at it!


Read more...

8 Tips for the Beginning PC Builder

You never forget your first time—building a PC, that is. You usually spend way too much time getting too little done, and though you end up with a system that probably works, you're not really sure because your hands are too scratched up to use the computer right away. Most first-timers aren't immediately sure they want to be lifers.

But that's natural. PC building, like anything else, is a skill that requires time, patience, and above all practice to perfect. But the results are almost always worth it, even when the process isn't ideal on your initial go-rounds.

We're assuming you already have a basic idea of what to do to build a PC—this isn't a step-by-step guide. But if you're a newbie, the following tips should save you some time and frustration.

1. Research, research, research. The most important part of your build happens long before you even pick up a screwdriver, and that's making sure you buy all the right parts. Spend as much time as you can on sites like Newegg.com, which have advanced search systems, verifying that all the components you're looking at work together today and will continue to do so tomorrow. Some specific questions you'll want to keep in mind:

  • If you're buying an Intel processor, is it of the right series (Core i7, Core i5, etc.) to fit in the motherboard you're considering?
  • Do the motherboard's RAM slots and the DIMMs themselves have comparable speeds to reduce the possibility of performance bottlenecks?
  • Does the motherboard have all the ports you need or want for your peripherals?
  • If you think you may want to upgrade later, are you leaving plenty of room for expansion in terms of drive bays, card slots, and so on?
  • Does your power supply have sufficient wattage to, uh, power all your other hardware? (Warning: Arithmetic may be required!)

2. Ground yourself. It's easy to charge yourself up with static electricity, especially if you're working in a carpeted room (or if you have to walk across one to get to where you're building). But what's just an annoying shock to you can be devastating to computer hardware. To be sure you're safe, discharge yourself before touching anything with sensitive circuits. Many PC toolkits come with antistatic wrist straps, and you can go that route if you want, but they can be inconvenient. A less restrictive way: just touch some of your case's bare metal. It'll be a moment of discomfort, but you'll get over it—a lot of PC hardware isn't as resilient.

3. Watch your bags. While we're on the subject of static: It's tempting to throw away potential garbage when you're unpacking prior to starting a build, but antistatic bags (such as the one the motherboard comes in) are worth hanging onto. Whether they're for holding components temporarily while you install something else, or for longer-term storage, the bags will help you preserve your tech investment.

4. Allow more time than you think you'll need. Things always seem simple when you're looking at parts in boxes or reading their manuals. But they can suddenly get a lot more complex when you're actually trying to install something. Leave time for dropping screws inside the case (and fishing them out again—see tip 5), struggling with DIMMs that don't lock down the way you think they should, and especially figuring out the front-panel wiring scheme. These snags can trip up even experts, so don't expect instant magic from start to finish.

5. Get grabby. You already know your most important PC-building tool is a Phillips-head screwdriver. But just behind it should be a three-pronged grabber. If your screwdriver's head isn't magnetized—or, heck, even if it is—you're all but guaranteed to have to fish out screws from uncomfortable nooks and crannies in your case at least once during a build. The grabber, which has extendable wire prongs, is thinner than your fingers, giving it the ability to grab screws when your fingers can't. One comes standard in almost every PC toolkit—get to know it well.

6. Put power first. Install your power supply unit (PSU) into your case before you do pretty much anything else. It'll be disappointing to find that there's not enough room to squeeze it in once you've added your motherboard, fans, drives, and other hardware. Put it into place first, then drape the cables somewhere out of the way while you work on everything else. Organizing the cables will be a pain, but it's a lot better than finding out you can't weave the PSU past the heat sink on the CPU.

7. Think outside the case. Do as much work as you can before inserting your components into the case—that will give you a lot more room to maneuver when doing tricky things like installing the processor and heat sink. Depending on the layout of your specific motherboard and the design of your hardware, this may not be possible, but it will automatically lower your blood pressure if it is. If you have removable cages or brackets for your hard drives or SSDs and optical drives, chances are you'll find things a lot less bruising if you can do most of the assembly outside the case first and then integrate everything later.

8. Don't get discouraged. Building your own PC is pretty simple once you set your mind to it, but there are lots of little places you can go wrong. Even pros sometimes screw up the brackets on the DVD drive, forget to connect a power cable, or confuse a couple of the front-panel wires. And even if you know exactly what to do, you can find yourself getting tripped up more easily than you might think. (Properly seating that Intel heat sink on the processor is maddening for everyone.) But be patient and stick with it—the results are almost always worth the trouble. No one's perfect the first time at bat, but the first time you hit the power switch and watch a computer you built from scratch boot up, you'll feel like you hit a grand slam.

Read more...

Monday, October 19, 2009

Cooler Master CM Storm Sniper Black Edition Review

Click To see more Photos of Cooler Master CM Storm Sniper Black Edition ReviewToday I am going to check out the latest chassis from Cooler Master called the CM Storm Sniper Black Edition. This is one of the first cases for gamers in the new CM series of cases. If you are a PC enthusiast looking to get a new chassis for a buildup of your latest gaming PC, the CM Storm Sniper Black Edition may be just what you need.

Features & Specifications
The CM Storm Sniper Black Edition is made from steel, ABS Plastic, and mesh. The entire chassis is colored black inside and out for sinister looks. The case measures 22.3" D x 10" W x 21.7" H and weighs a whopping 26.4 pounds. The case supports micro-ATX and ATX mainboards. There are five exposed 5.25" drive bays and a single 3.5" exposed bay that uses an insert inside one of the 5.25" bays. Inside the chasses are five 3.5" bays for hard drives.

The cooling system of the case has a 200mm fan with blue LED lights, the top has the same fan, and the side has a 200mm fan as well. An additional 200mm fan is in the rear of the case as well. The chassis can be fitted with a liquid cooling system. Seven expansion slots are on the rear and the font panel has four USB ports, a FireWire port, eSATA, mic, and headphone jack. There are grommets on the rear of the case to pass water-cooling tubing and the font panel has a built in fan controller.

In Use
I am a big fan of Cooler Master PC cases, they have always had top-notch build quality, and the CM Storm Sniper Black Edition is no different. The chassis is well built and can with stand rough use. Inside the case, the black color makes for a dark and sinister home for your gaming gear and the edges are rounded and smooth. That means that you aren’t likely to cut yourself during an install. The roomy chassis can hold the largest video cards around today and has plenty of expansion.

The chassis also uses a tool-free design so you can install optical drives and hard drives without needing your screwdriver handy. The case also has feet that can be pivoted out to provide more stability if needed. The inside of the case is roomy enough to support a dual 120mm radiator. You can adjust the speed of the fans inside the case using the rotary knob on the font panel and you can turn the LED lights on and off with a switch so you can have lights on if you want and go dark if you don’t.

The case also has a unique StormGuard system that allows you to protect your peripherals from theft at the LAN party. The security system is basically a special expansion cover and you just pass the USB cables through slots in the port cover to tie them to your PC. The side panel of the case is made from mesh and has no window. As cool looking as the case is on the inside, you might expect a windowed side panel to be an option.


Cooler Master CM Storm Sniper Black Edition Review


Pros

  • Good build quality
  • Lots of space
  • Fan controller

Cons

  • Heavy
  • No windowed side panel

Verdict
The CM Storm Sniper Black Edition is a fantastic chassis to choose for your next PC build up. It has plenty of room, looks good, and is very well built. It would be hard to go wrong with the CM Storm Sniper Black Edition as the home for your gaming rig.

Read more...

Saturday, October 10, 2009

Central processing unit

The Central Processing Unit (CPU) or processor is the portion of a computer system that carries out the instructions of a computer program, and is the primary element carrying out the computer's functions. This term has been in use in the computer industry at least since the early 1960s (Weik 2007). The form, design and implementation of CPUs have changed dramatically since the earliest examples, but their fundamental operation remains much the same.

Early CPUs were custom-designed as a part of a larger, sometimes one-of-a-kind, computer. However, this costly method of designing custom CPUs for a particular application has largely given way to the development of mass-produced processors that are made for one or many purposes. This standardization trend generally began in the era of discrete transistor mainframes and minicomputers and has rapidly accelerated with the popularization of the integrated circuit (IC). The IC has allowed increasingly complex CPUs to be designed and manufactured to tolerances on the order of nanometers. Both the miniaturization and standardization of CPUs have increased the presence of these digital devices in modern life far beyond the limited application of dedicated computing machines. Modern microprocessors appear in everything from automobiles to cell phones and children's toys.

History of Central Processing Unit


Main article: History of general purpose CPUs

EDVAC, one of the first electronic stored program computers.

Computers such as the ENIAC had to be physically rewir ed in order to perform different tasks. These machines are often referred to as "fixed-program computers," since they had to be physically reconfigured in order to run a different program. Since the term "CPU" is generally defined as a software (computer program) execution device, the earliest devices that could rightly be called CPUs came with the advent of the stored-program computer.

The idea of a stored program computer was already present in the design of J. Presper Eckert and John William Mauchly's ENIAC, but was init ially omitted so the machine could be finished sooner. On June 30, 1945, before ENIAC was even completed, mathematician John von Neumann distributed the paper entitled "First Draft of a Re port on the EDVAC ." It outlined the design of a stored-program computer that would eventually be completed in August 1949 (von Neumann 1945). EDVAC was designed to perform a certa in number of instructions (or operations) of various types. These instructi ons could be combined to create useful programs for the EDVAC to run. Significantly, the programs written for EDVAC were stored in high-speed computer memory rather than specified by the physical wiring of the computer. This overcame a severe limitation of ENIAC, which was the considerable time and effort required to reconfigure the computer to perform a new task. With vo n Neumann's design, the program, or software, that EDVAC ran could be changed simply by changing the contents of the computer's memory.

While von Neumann is most often credited with the design of the stored-program c omputer because of his design of EDVAC, others before him, such as Konra d Zuse, had suggested and implemented similar ideas. The so-called Ha rvard architecture of the Harvard Mark I, which was completed before EDVAC, also utilized a stored-program design using punched paper tape rather than electronic memory. The key difference between the von Neumann and Harvard architectures is that the latter separates th e storage and treatment of CPU instructions and data, while the former uses the same memory space for both. Most moder n CPUs are primarily von Neumann in design, but elements of the Harvard architecture are commonly seen as well.

As a digital device, a CPU is limited to a set of discrete states, and requires some kind of switching elements to differentiate between and change states. Prior to com mercial development of the transistor, electrical relays and vacuum tubes (thermionic valves) were commonly used as switching elements. Although these had distinct sp ee d advantages over earlier, purely mechanical designs, they were unreliable for various reaso ns. For example, building direct current sequential logic circuits out of relays requires additional hardware to cope with the problem of contact bounce. While vacuum tubes do not suffer from contact bounce, they must heat up before becoming fully operational, and they eventually cease to f unction due to slow contamination of their cathodes that occurs in the course of normal operation. If a tube's vacuum seal leaks, as sometimes happens, ca thode contamination is accelerated. See vacuum tube. Usually, when a tub e failed, the CPU would have to be diagnosed to locate the failed component so it could be replaced. Theref ore, early electronic (vacuum tube based) computers were generally faster but less reliable than electromechanical (relay based) computers.

Tube computers like EDVAC tended to average eight hours betw een failures, whereas relay computers like the (slower, but earlier) Harv ar d Mark I failed very rarely (Weik 1961:238). In the end, tube based CPUs became dominant because the significa nt speed advantages afforded generally outweighed the reliability problems. Most of these early synchronous CPUs ran at low clock rates compared to modern microelectronic designs (see below for a discussion of clock rate). Clock signal frequencies ranging from 100 kHz to 4 MHz were very common at this time, limited largely by the speed of the switching devices they were buil t with.

Discrete transi

stor and Integrated Circuit CPUs


CPU, core memory, and external bus interface of a DEC PDP-8/I. made of medium-scale integrated circuits

The design complexity of CPUs increased as various technologies facilitated building smaller and more reliable electronic devices. The first such improvement came wi th the advent of the transistor. Transistorized CPUs during the 1950s and 1960s no longer had to be built out of bulky, unreliable, and fragile switching elements like vacuum tubes and electrical relays. With this improvement more complex and reliable CPUs were b uilt onto one or several printed circuit boards containing discrete (individual) compone nts.

During this period, a method of manufacturing many transistors in a compact space gained popularity. The integrated circuit (IC) allowed a large number of tran sistors to be manufactured on a single semiconductor-based die, or "chip." At first only very basic non-specialized digital circuits such as NOR gates were miniaturized into ICs. CPUs based up on these "building block" ICs are generally referred to as "small-scale integration" (SSI) devices. SSI ICs, such as the ones used in the Apollo guidance computer, usually contained transistor counts numbering in multiples of ten. To build an entire CPU out of SSI ICs required thousands of individual chips, but still consumed much less space and power th an earlier discrete transistor designs. As microelectronic technology advanced, an increasing number of transistors were placed on ICs, thus decreasing the quantity of individual ICs needed for a complete CPU. MSI and LSI (medium- and large-scale integration) I Cs increased transistor counts to hundreds, and then thousands.

In 1964 IBM introduced its System/360 computer architecture which was used in a series of computers that could run the same programs with different speed and per formance. This was significant at a time when most electronic computers were incompatible with one another, even those made by the same manufacturer. To facilitate this improvement, IBM utilized the concept of a microprogram (often called "microcode"), which still s ees widespread usage in modern CPUs (Amdahl et al. 1964). The System/360 architecture was so p opular that it dominated the mainframe computer market for the decades and left a legacy that is still continued by similar modern computers like the IBM zSeries. In the same year (1964), Digital Equipment Corporation (DEC) introduced another influential co mputer aimed at the scientific and research markets, the PDP-8. DEC would later introduce the extremely popular PDP-11 line that originally was built with SSI ICs but was eventually implemented with LSI components once these became practical. In stark contrast with its SSI and MSI predeces sors, the first LSI implementation of the PDP-11 contained a CPU composed of only four LSI integrated circuits (Digital Equipment Corporation 1975).

Transistor-based computers had several distinct advantages over their predecessors. Aside from facilitating increased reliability and lower power consumption, transistors also allowed CPUs to operate at much higher speeds because of the short switchin g time of a transistor in comparison to a tube or relay. Thanks to both the increased reliability as well as the dramatically increased speed of the switching elements (which were almost exclusively transistors by this time), CPU clock rates in the tens of megahertz were obtained during this period . Additionally while discrete transistor and IC CPUs were in heavy usage, new high-performance designs like SIMD (Single Instruction Multiple Data) vector processors began to appear. These early experimental designs later gave rise to the era of specialized supercomputers like those made by Cray Inc.

Microprocessors

Main article: Microprocessor


The integrated circuit from an Intel 8742, an 8-bit microcontroller that includes a CPU running at 12 MHz, 128 bytes of RAM, 2048 bytes of EPROM, and I/O in the same chip.

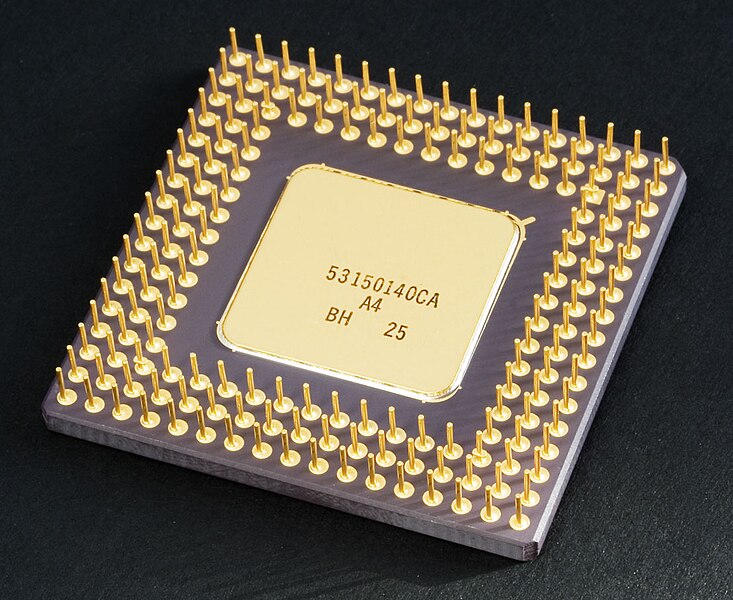
Intel 80486DX2 microprocessor in a ceramic PGA package.

The introduction of the microprocessor in the 1970s significantly affected the design and implementation of CPUs. Since the introduction of the first microprocessor (the Intel 4004) in 1970 and the first widely used microprocessor (the Intel 8080) in 1 974, this class of CPUs has almost completely overtaken all other central processing unit implementation methods. Mainframe and minicomputer manufacturers of the time launched proprietary IC development programs to upgrade their older computer architectures, and eventually produced instruction set compatible microprocessors that were backward-compatible with their older hardware and software. Combined with the advent and eventual vas t success of the now ubiquitous personal computer, the term "CPU" is now applied almost exclusively to microprocessors.

Previous generations of CPUs were implemented as discrete components and numerous small integrated circuits (ICs) on one or more circuit boards. Microproces sors, on the other hand, are CPUs manufactured on a very small number of ICs; usually just one. The overall smaller CPU size as a result of being implemented on a single die means faster switching time because of physical factors like decreased gate parasitic capacitance . This has allowed synchronous microprocessors to have clock rates rangin g from tens of megahertz to several gigahertz. Additionally, as the ability to construct exceedingly small transistors on an IC has increased, the complexity and number of transistors in a single CPU has increased dramatically. This widely observed trend is described by Moore's law, which has proven to be a fairly accurate predictor of the growth of CPU (and other IC) complexity to date.

While the complexity, size, construction, and general form of CPUs have changed drastically over the past sixty years, it is notable that the basic design and function ha s not changed much at all. Almost all common CPUs today can be very accurately described as von Neumann stored-program machines. As the aforementioned Moore's law continues to hold true, concerns have arisen about the limits of integrated circuit transistor technology. Extreme miniaturization of electronic gates is causing the effects of phenomena like electromigration and subthreshold leakage to become muc h more significant. These newer concerns are among the many factors causing researchers to investigate new methods of computing such as the quantum computer, as well as to expand the usage of parallelism and other methods that extend the usefulness of the classical von Neumann model.

CPU operation


The fundamental operation of most CPUs, regardless of the physical form they take, is to execute a sequence of stored instructions called a program. The program is represented by a series of numbers that are kept in some kind o f computer memory . There are four steps that nearly all CPUs use in their operation: fetch, decode, execute, and writeback.

The first step, fetch, involves retrieving an instruction (w hich is represented by a number or sequence of numbers) from program memory. The location in program memory is determined by a program counter (PC), which stores a number that identifies the current position in the program. In other words, the program counter keeps track of the CPU's place in the current program. After an instruction is fetched, th e PC is incremented by the length of the instruction word in terms of memory units.Often the instruction to be fetched must be retrieved from relatively slow memor y, causing the CPU to stall while waiting for the instruction to be returned. This issue is largely addressed in modern processors by caches and pipeline architectures (see below).

The instruction that the CPU fetches from memory is used to determine what the CPU is to do. In the decode step, the instruction is broken up into parts that have significance to other portions of the CPU. The way in which the numerical instruction value is interpreted is defined by the CPU's instruction set architecture (ISA). Often, one group of numbers in the instruction, called the opcode, indicates which operation to perfor m. The remaining parts of the number usually provide information required for that instruction, such as operands for an addition operation. Such operands may be given as a constant value (called an immediate v alue), or as a place to locate a value: a register or a memory address, as determined by some addressing mode. In older designs the portions of the CPU responsible for instruction decoding were unchangeable hardware devices. However, in more abstract and complicated CPUs and ISAs, a microprogram is often used to assist in translating instructions into various configuration signals for the CPU. This mic roprogram is sometimes rewritable so that it can be modified to change the way the CPU decodes instructions even after it has been manufactured.

After the fetch and decode steps, the exe cute step is performed. During this step, various portions of the CPU are connected so they can perform the desired operation. If, for instance, an addition operation was requested, an arithmetic logic unit (ALU) will be connected to a set of inputs and a set of outputs. The inputs provide the numbers to be added, and the outputs will contain the final sum. The ALU contains the circuitry to pe rform simple arithmetic and logical operations on the inputs (like addition and bitwise operations). If the addition operation produces a result too large for the CPU to handle, an arithmetic overflow flag in a flags re gister may also be set.

The final step, writeback, simply "writes back" the results of the execute step to some form of memory. Very often the results are written to some internal CPU register for quick access by subsequent instructions. In other cases results may b e written to slower, but cheaper and larger, main memory. Some types of instruction s manipulate the program counter rather than directly produce result data. These are generally called "jumps" and facilitate behavior like loops, conditional program ex ecution (through the use of a conditional jump), and functions in programs. Many instructions will also change the state of digits in a "flags" register. These flags can be used to influence how a program behaves, since they often indicate the outcome of various operations. For example, one type of "compare" in struction considers two values and sets a number in the flags register according to which one is greater. This flag could then be used by a later jump instruction to determine program flow.

After the execution of the instruction and writeback of the resulting data, the entire process repeats, with the next instruction cycle normally fetching the next-in-sequence instruction because of the incremented value in the program counter. If the completed instruction was a jump, the program counter will be modified to contain the address of the instruction that was jumped to, and program execution continues normally. In more complex CPUs than the one described here, multiple instructions can be fetched, decoded, and executed simultaneously. This section describes what is generally referred to as the "Classic RISC pipeline," which in fact is quite common among the simple CPUs used in many e lectronic devices (often called microcontroller). It largely ignores the important role of CPU cache, and therefore the access stage of the pipeline.

Design and implementation

Main article: CPU design

Integer range


The way a CPU represents numbers is a design choice that affects the most basic ways in which the device functions. Some early digital computers used an electrical model of the common decimal (base ten) numeral system to represent numbers internally. A few other computers have used more exotic numeral systems like ternary (base three). Nearly all modern CPUs represent numbers in binary form, with each digit being represented by some two-valued physical quantity such as a "high" or "low" voltage.

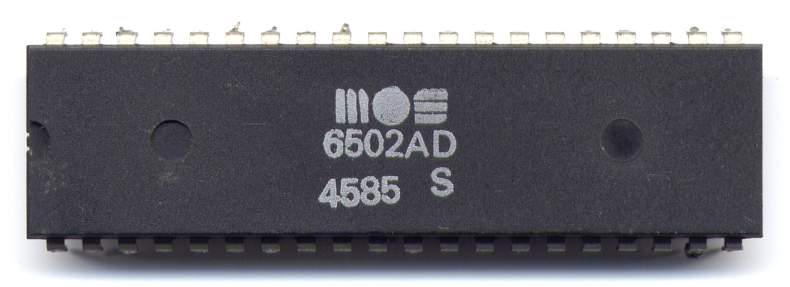
MOS 6502 microprocessor in a dual in-line package, an extremely popular 8-bit design.

Related to number representation is the size and precision of numbers that a CPU can represent. In the case of a binary CPU, a bit refers to one significant place in the numbers a CPU deals with. The number of bits (or numeral places) a CPU uses to represe nt numbers is often called "word size", "bit width", "data path width", or "integer precision" when dealing with strictly integer numbers (as opposed to floating point). This number differs between architectures, and often within different parts of the very same CPU. For example, an 8-bit CPU deals with a range of numbers that can be represented by eight binary digits (each digit having two possible values), that is, 28 or 256 discrete numbers. In effect, integer size sets a hardware limit on the range of integers the software run by the CPU can utilize.

Integer range can also affect the number of locations in memory the CPU can address (locate). For example, if a binary CPU uses 32 bits to represent a memory address, and each memory address represents one octet (8 bits), the maximum quantity of memory that CPU can address is 232 octets, or 4 GiB. This is a very simple view of CPU address space, and many designs use more complex addressing methods like paging in order to locate more memory than their integer range would allow with a flat address space.

Higher levels of integer range require more structures to deal with the additional digits, and therefore more complexity, size, power usage, and general expense. It is not at all uncommon, therefore, to see 4- or 8-bit microcontrollers used in modern applications, even though CPUs with much higher range (such as 16, 32, 64, even 128-bit) are available. The simpler microcontrollers are usually cheaper, use less powe r, and therefore dissipate less heat, all of which can be major design considerations for electronic devices. However, in higher-end applications, the b enefits afforded by the extra range (most often the additional address space) are more significant and often affect design choices. To gain some of the advantages afforded by both lower and higher bit lengths, many CPUs are designed with different bit widths for different portions of the dev ice. For example, the IBM System/370 used a CPU that was primarily 32 bit, but it used 128-bit precision inside its floating point units to facilitate greater accuracy and range in floating point numbers (Amdahl et al. 1964). Many later CPU designs use similar mixed bit width, especially when the processor is meant for general-purpose usage where a reasonable balance of integer and floating point capability is required.

Clock rate


Main article: Clock rate

Most CPUs, and indeed most sequential logic devices, are synchronous in nature.[7] That is, they are designed and operate on assumptions about a synchronization signal. This signal, known as a clock signal, usually takes the form of a periodic square wave. By calculating the maximum time that electrical signals can move in various branches of a CPU's many circuits, the designers can select an appropriate period for the clock signal.

This period must be longer than the amount of time it takes for a signal to move, or propagate, in the worst-case scenario. In setting the clock period to a value well above the worst-case propagation delay, it is possible to design the entire CPU and the way it moves data around the "edges" of the rising and falling clock signal. This has the advantage of simplifying the CPU significantly, both from a d esign perspective and a component-count perspective. However, it also carries the disadvantage that the entire CPU must wait on its slowest elements, even though some portions of it are much faster. This limitation has largely been compensated for by various methods of increasing CPU parallelism. (see below)

However, architectural improvements alone do not solve all of the drawbacks of globally synchronous CPUs. For example, a clock signal is subject to the delays of any other electrical signal. Higher clock rates in increasingly complex CPUs make it more difficult to keep the clock signal in phase (synchr onized) throughout the entire unit. This has led many modern CPUs to require multiple identical clock signals to be provided in order to avoid delaying a single signal significantly enough to cause the CPU to malfunction. Another major issue as clock rates increase dramatically is the amount of heat that is dissipated by the CPU. The constantly changing clock causes many components to switch regardless of whether th ey are being used at that time. In general, a component that is switching uses more energy than an element in a static state. Therefore, as clock rate increases, so does heat dissipation, causing the CPU to require more effective cooling solutions.

One method of dealing with the switching off unneeded components is called clock gating, which involves turning off the clock signal to unneeded components (effectively disabling them). However, this is often regarded as difficult to implement and therefore does not see common usage outside of very lo w-power designs.[8] Another m ethod of addressing some of the problems with a global clock signal is the removal of the clock signal altogether. While removing the global clock signal makes the design process considerably more complex in many ways, asynchronous (or clockless) designs carry mark ed advantages in power consumption and heat dissipation in comparison with similar synchronous designs. While somewhat uncommon, entire asynchronous CPUs have been built without utilizing a global clock signal. Two notable examples of this are the ARM compliant AMULET and the MIPS R3000 compatible MiniMIPS. Rather than totally removing the clock signal, some CPU designs allow certain portions of the device to be asynchronous, such as using asynchronous ALUs in conjunction with superscalar pipelining to achieve some a rithmetic performance gains. While it is not altogether clear whether totally asynchronous designs can perform at a comparable or better level than their synchronous counterparts, it is evident that they do at least excel in simpler math operations. This, combined with their excellent power consumption and hea t dissipation properties, makes them very suitable for embedded computers (Garside et al. 1999).

Parallelism


Main article: Parallel computing

Model of a subscalar CPU. Notice that it takes fifteen cycles to complete three instructions.

The description of the basic operation of a CPU offered in the previous section describes the simplest form that a CPU can take. This type of CPU, usually referred to as subscalar, operates on and executes one instruction on one or two pieces of data at a time.

This process gives rise to an inherent inefficiency in subscalar CPUs. Since only one instruction is executed at a time, the entire CPU must wait for that instruction to complete before proceeding to the next instruction. As a result the subscalar CPU gets "hung up" on instructions which take more than one clock cycle to complete execution. Even ad ding a second execution unit (see below) does not improve performance much; rather than one pathway being hung up, now two pathways are hung up and the number of unused transistors is increased. This design, wherein the CPU's execution resources can operate on only one instruction at a time, can only possibly reach scalar performance (one instruction per clock). However, the performance is nearly always subscalar (less than one instruction per cycle).

Attempts to achieve scalar and better performance have resulted in a variety of design methodologies that cause the CPU to behave less linearly a nd more in parallel. When referring to parallelism in CPUs, two terms are generally used to classify these design techniques. Instruction level parallelism (ILP) seeks to increase the rate at which instructions are executed within a CPU (that is, to increase the utilization of on-die execution resources), and thread level parallelism (TLP) purposes to increase the number of threads (effectively individual programs) that a CPU can execute simultaneously. Each methodology differs both in the ways in which they are implemented, as well as the relative effectiveness they afford in increasing the CPU's performance for an application.

Instruction level parallelism


Main articles: Instruction pipelining and Superscalar


Basic five-stage pipeline. In the best case scenario, this pipeline can sustain a completion rate of one instruction per cycle.

One of the simplest methods used to accomplish increased parallelism is to begin the first steps of instruction fetching and decoding before the prior instruction finishes executing. This is the simplest form of a technique known as instruction pipelining, and is utilized in almost all modern general-purpose CPUs. Pipelining allows more than one instruction to be executed at any given time by breaking down the execution pathway into discrete stages. This separation can be compared to an assembly line, in which an instruction is made more complete at each stage until it exits the execution pipeline and is retired.

Pipelining does, however, introduce the possibility for a situation where the result of the previous operation is needed to complete the next operation; a condition often termed data dependency conflict. To cope with this, additional care must be taken to check for these sorts of conditions and delay a portion of the instruction pipeline if this occurs. Naturally, accomplishing this requires additional circuitry, so pipelined processors are more complex than subscalar ones (though not very significantly so). A pipelined processor can become very nearly scalar, inhibited only by pipeline stalls (an instruction spending more than one clock cycle in a stage).

Simple superscalar pipeline. By fetching and dispatching two instructions at a time, a maximum of two instructions per cycle can be completed.

Further improvement upon the idea of instruction pipelining led to the development of a method that decreases the idle time of CPU components even further. Designs that are said to be superscalar include a long instruction pipeline and multiple identical execution units. [Huynh 2003] In a superscalar pipeline, multiple instructions are read and passed to a dispatcher, which decides whether or not the instructions can be executed in parallel (simultaneously). If so they are dispatched to available execution units, resulting in the ability for several instructions to be executed simultaneously. In general, the more instructions a superscalar CPU is able to dispatch simultaneously to waiting execution units, the more instructions will be completed in a given cycle.

Most of the difficulty in the design of a superscalar CPU architecture lies in creating an effective dispatcher. The dispatcher needs to be able to quickly and correctly determine whether instructions can be executed in parallel, as well as dispatch them in such a way as to keep as many execution units busy as possible. This requires that the instruction pipeline is filled as often as possible and gives rise to the need in superscalar architectures for significant amounts of CPU cache. It also makes hazard-avoiding techniques like branch prediction, speculative execution, and out-of-order execution crucial to maintaining high levels of performance. By attempting to predict which branch (or path) a conditional instruction will take, the CPU can minimize the number of times that the entire pipeline must wait until a conditional instruction is completed. Speculative execution often provides modest performance increases by executing portions of code that may or may not be needed after a conditional operation completes. Out-of-order execution somewhat rearranges the order in which instructions are executed to reduce delays due to data dependencies.

In the case where a portion of the CPU is superscalar and part is not, the part which is not suffers a performance penalty due to scheduling stalls. The original Intel Pentium (P5) had two superscalar ALUs which could accept one instruction per clock each, but its FPU could not accept one instruction per clock. Thus the P5 was integer superscalar but not floating point superscalar. Intel's successor to the Pentium architecture, P6, added superscalar capabilities to its floating point features, and therefore afforded a significant increase in floating point instruction performance.

Both simple pipelining and superscalar design increase a CPU's ILP by allowing a single processor to complete execution of instructions at rates surpassing one instruction per cycle (IPC).[10] Most modern CPU designs are at least somewhat superscalar, and nearly all general purpose CPUs designed in the last decade are superscalar. In later years some of the emphasis in designing high-ILP computers has been moved out of the CPU's hardware and into its software interface, or ISA. The strategy of the very long instruction word (VLIW) causes some ILP to become implied directly by the software, reducing the amount of work the CPU must perform to boost ILP and thereby reducing the design's complexity.

Thread level parallelism


Another strategy of achieving performance is to execute multiple programs or threads in parallel. This area of research is known as parallel computing. In Flynn's taxonomy, this strategy is known as Multiple Instructions-Multiple Data or MIMD.

One technology used for this purpose was multiprocessing (MP). The initial flavor of this technology is known as symmetric multiprocessing (SMP), where a small number of CPUs share a coherent view of their memory system. In this scheme, each CPU has additional hardware to maintain a constantly up-to-date view of memory. By avoiding stale views of memory, the CPUs can cooperate on the same program and programs can migrate from one CPU to another. To increase the number of cooperating CPUs beyond a handful, schemes such as non-uniform memory access (NUMA) and directory-based coherence protocols were introduced in the 1990s. SMP systems are limited to a small number of CPUs while NUMA systems have been built with thousands of processors. Initially, multiprocessing was built using multiple discrete CPUs and boards to implement the interconnect between the processors. When the processors and their interconnect are all implemented on a single silicon chip, the technology is known as a multi-core microprocessor.

It was later recognized that finer-grain parallelism existed with a single program. A single program might have several threads (or functions) that could be executed separately or in parallel. Some of earliest examples of this technology implemented input/output processing such as direct memory access as a separate thread from the computation thread. A more general approach to this technology was introduced in the 1970s when systems were designed to run multiple computation threads in parallel. This technology is known as multi-threading (MT). This approach is considered more cost-effective than multiprocessing, as only a small number of components within a CPU is replicated in order to support MT as opposed to the entire CPU in the case of MP. In MT, the execution units and the memory system including the caches are shared among multiple threads. The downside of MT is that the hardware support for multithreading is more visible to software than that of MP and thus supervisor software like operating systems have to undergo larger changes to support MT. One type of MT that was implemented is known as block multithreading, where one thread is executed until it is stalled waiting for data to return from external memory. In this scheme, the CPU would then quickly switch to another thread which is ready to run, the switch often done in one CPU clock cycle, such as the UltraSPARC Technology. Another type of MT is known as simultaneous multithreading, where instructions of multiple threads are executed in parallel within one CPU clock cycle.

For several decades from the 1970s to early 2000s, the focus in designing high performance general purpose CPUs was largely on achieving high ILP through technologies such as pipelining, caches, superscalar execution, out-of-order execution, etc. This trend culminated in large, power-hungry CPUs such as the Intel Pentium 4. By the early 2000s, CPU designers were thwarted from achieving higher performance from ILP techniques due to the growing disparity between CPU operating frequencies and main memory operating frequencies as well as escalating CPU power dissipation owing to more esoteric ILP techniques.

CPU designers then borrowed ideas from commercial computing markets such as transaction processing, where the aggregate performance of multiple programs, also known as throughput computing, was more important than the performance of a single thread or program.

This reversal of emphasis is evidenced by the proliferation of dual and multiple core CMP (chip-level multiprocessing) designs and notably, Intel's newer designs resembling its less superscalar P6 architecture. Late designs in several processor families exhibit CMP, including the x86-64 Opteron and Athlon 64 X2, the SPARC UltraSPARC T1, IBM POWER4 and POWER5, as well as several video game console CPUs like the Xbox 360's triple-core PowerPC design, and the PS3's 7-core Cell microprocessor.

Data parallelism


Main articles: Vector processor and SIMD

A less common but increasingly important paradigm of CPUs (and indeed, computing in general) deals with data parallelism. The processors discussed earlier are all referred to as some type of scalar device.[11] As the name implies, vector processors deal with multiple pieces of data in the context of one instruction. This contrasts with scalar processors, which deal with one piece of data for every instruction. Using Flynn's taxonomy, these two schemes of dealing with data are generally referred to as SISD (single instruction, single data) and SIMD (single instruction, multiple data), respectively. The great utility in creating CPUs that deal with vectors of data lies in optimizing tasks that tend to require the same operation (for example, a sum or a dot product) to be performed on a large set of data. Some classic examples of these types of tasks are multimedia applications (images, video, and sound), as well as many types of scientific and engineering tasks. Whereas a scalar CPU must complete the entire process of fetching, decoding, and executing each instruction and value in a set of data, a vector CPU can perform a single operation on a comparatively large set of data with one instruction. Of course, this is only possible when the application tends to require many steps which apply one operation to a large set of data.

Most early vector CPUs, such as the Cray-1, were associated almost exclusively with scientific research and cryptography applications. However, as multimedia has largely shifted to digital media, the need for some form of SIMD in general-purpose CPUs has become significant. Shortly after floating point execution units started to become commonplace to include in general-purpose processors, specifications for and implementations of SIMD execution units also began to appear for general-purpose CPUs. Some of these early SIMD specifications like HP's Multimedia Acceleration eXtensions (MAX) and Intel's MMX were integer-only. This proved to be a significant impediment for some software developers, since many of the applications that benefit from SIMD primarily deal with floating point numbers. Progressively, these early designs were refined and remade into some of the common, modern SIMD specifications, which are usually associated with one ISA. Some notable modern examples are Intel's SSE and the PowerPC-related AltiVec (also known as VMX).

Read more...

About This Blog

Lorem Ipsum